dry pour concrete instructions
Dry Pour Concrete Instructions: A Comprehensive Guide
Dry pour concrete offers a streamlined construction method, ideal for various projects. This guide details the process, from preparation to finishing, ensuring a durable and level surface.
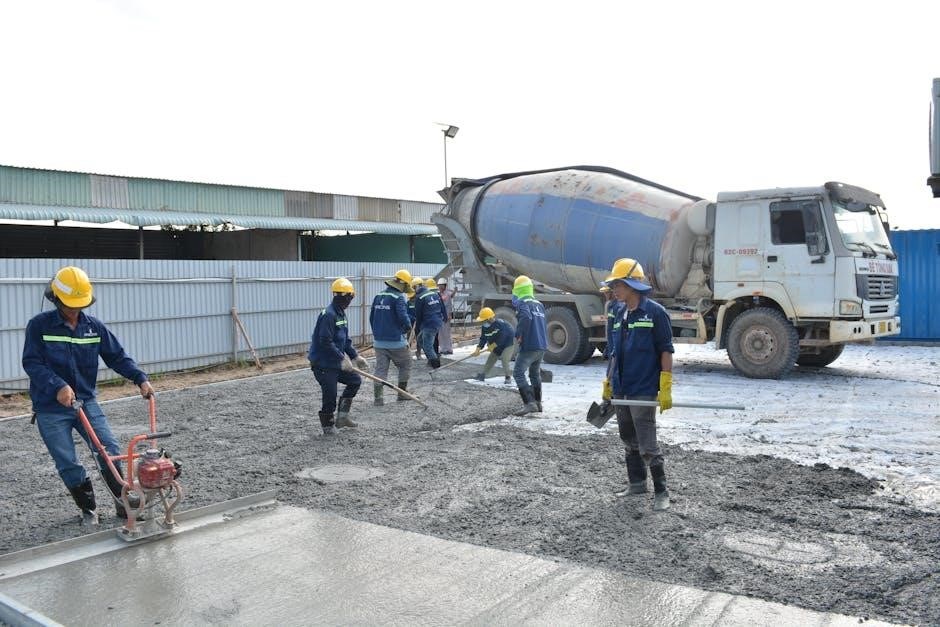
Screeding, using a board with assistance, is key to smoothing the final concrete layer.
Dry pour concrete represents a significant advancement in concrete placement techniques, diverging from traditional wet-mix methods. It involves utilizing a pre-mixed, dry concrete blend directly poured into formwork, followed by on-site hydration. This approach is gaining popularity due to its efficiency, reduced waste, and enhanced control over the final product.
Historically, concrete relied heavily on precise water-to-cement ratios mixed at a central batching plant or on-site. Dry pour shifts this paradigm, allowing for greater flexibility, particularly in remote locations or projects with limited access. The process demands careful execution, focusing on thorough mixing after placement to ensure uniform hydration and strength development.
This comprehensive guide will delve into the intricacies of dry pour concrete, covering everything from material selection and site preparation to the pouring, consolidating, and curing stages. We will explore the benefits and applications, equipping you with the knowledge to successfully implement this innovative technique. Understanding the nuances of screeding, as a vital finishing step, will also be addressed.
What is Dry Pour Concrete?
Dry pour concrete is a construction method utilizing a pre-blended mixture of cement, aggregates, and admixtures – delivered and placed in a completely dry state. Unlike conventional concrete, water isn’t added until after the dry materials are positioned within the formwork. This fundamental difference dictates the entire process, requiring specialized techniques for hydration and consolidation.
The dry mix is typically delivered in bulk via pneumatic trucks, ensuring a consistent and homogenous blend. Upon reaching the site, a carefully controlled amount of water is introduced, often through a specialized nozzle or distribution system, while simultaneously mixing the components. This on-site hydration allows for adjustments based on environmental conditions and desired concrete properties.
Essentially, dry pour transforms the construction site into a mini-batching plant. The technique is particularly suited for applications where precise control over the concrete mix is crucial, or where minimizing water content is beneficial. Proper screeding techniques, as a finishing step, are essential for achieving a level surface.
Benefits of Using Dry Pour Concrete
Dry pour concrete presents several advantages over traditional wet-mix methods. A primary benefit is reduced waste; precise material delivery minimizes leftover concrete, contributing to cost savings and environmental responsibility. The method also allows for greater control over the concrete mix, adapting to specific project requirements and ambient conditions.
Furthermore, dry pour often results in a stronger, more durable concrete due to minimized segregation of aggregates during placement. The on-site hydration process ensures optimal cement hydration, leading to enhanced compressive strength. Reduced water content also translates to lower shrinkage and cracking potential.
Logistically, dry pour can simplify operations, particularly on sites with limited access or mixing capabilities. The dry mix is easier to transport and handle than wet concrete. Finally, the technique facilitates faster placement and quicker turnaround times, accelerating project completion. Effective screeding is vital to capitalize on these benefits, ensuring a smooth, even finish.
Applications of Dry Pour Concrete
Dry pour concrete’s versatility makes it suitable for a wide range of construction applications. It excels in projects demanding flatness and precision, such as industrial flooring, warehouse slabs, and agricultural buildings. The method is particularly effective for large-area pours where consistent quality is paramount.
Dry pour is also well-suited for applications requiring minimal disruption, like renovations or repairs, as it reduces the need for extensive formwork and wet-mix equipment. It’s frequently used for creating hard-standing areas, pathways, and even domestic slabs, offering a durable and long-lasting surface.
Furthermore, dry pour concrete finds application in specialized areas like topping slabs for existing concrete floors, providing a level surface for coatings or finishes. Its adaptability extends to sloping surfaces and areas with complex geometries. Proper screeding techniques are crucial for achieving the desired finish in these diverse applications, ensuring a smooth and functional result.
Tools and Materials Required
Successfully executing a dry pour concrete project necessitates a specific set of tools and materials. Essential components include the dry concrete mix itself – a pre-blended aggregate and cement combination. A robust power float or hand float is vital for initial surface consolidation and smoothing.
For accurate leveling, a straight screeding board, ideally long enough to span the pour width, is crucial, along with appropriate screeding rails or guides. Compaction equipment, such as a plate compactor, prepares the base effectively. Measuring tools like levels and tapes ensure accuracy throughout the process.
Safety gear is paramount: gloves, safety glasses, and dust masks protect against cement exposure. Wheelbarrows or mechanical mixers facilitate material transport. Depending on the project, reinforcement materials like wire mesh or rebar may be needed. Finally, a power trowel is often used for achieving a polished, durable finish, and curing compounds are essential for optimal strength development.
Concrete Mix Design for Dry Pour
Dry pour concrete mix design differs from traditional wet-mix methods, prioritizing a consistent, free-flowing blend. Typically, the mix consists of Portland cement and carefully graded aggregates, eliminating the need for added water at the pour site. A common ratio is around 1 part cement to 3-4 parts aggregate by weight, though this varies based on desired strength and application.
The aggregate blend should include coarse aggregates (like gravel or crushed stone) for structural integrity and fine aggregates (sand) to fill voids and improve workability. Consider using a pre-blended dry mix to ensure consistent proportions.
Adjusting the cement content impacts strength; higher cement ratios yield stronger concrete but can increase shrinkage. Proper mix design minimizes dust and segregation during pouring. Always consult manufacturer recommendations for specific dry-mix products. Testing a small batch is advisable to confirm the mix’s flowability and consolidation characteristics before a large-scale pour.
Aggregate Selection for Dry Pour
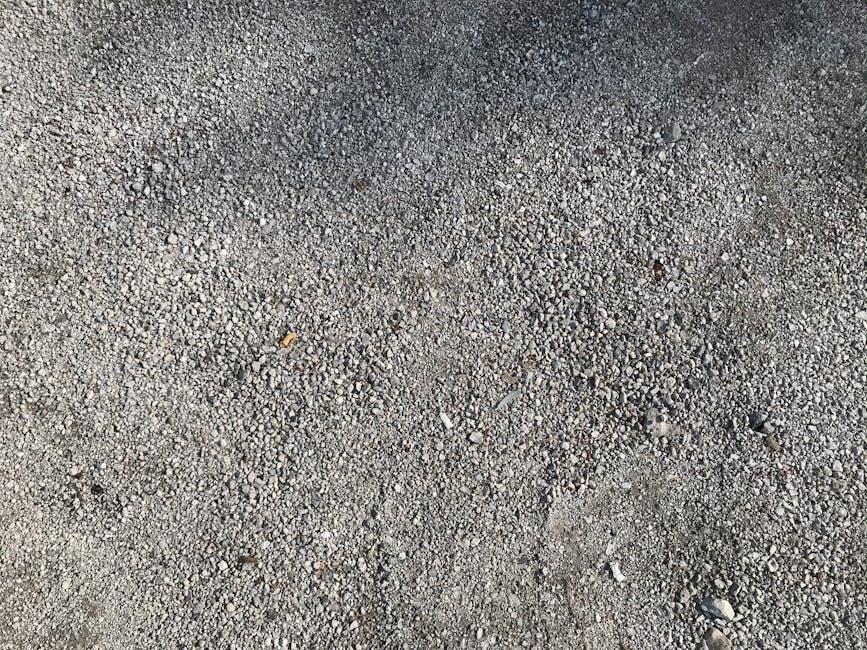
Aggregate selection is crucial for successful dry pour concrete. The ideal aggregate blend ensures optimal packing density, flowability, and strength. Coarse aggregates, typically crushed stone or gravel, provide the concrete’s structural backbone, resisting loads and minimizing shrinkage. Their maximum size should be appropriate for the pour’s thickness and reinforcement spacing.
Fine aggregates, like sand, fill the voids between coarse aggregates, enhancing density and workability. The sand should be clean, well-graded, and free of organic impurities. A consistent gradation—a balanced mix of particle sizes—is vital for minimizing segregation during pouring and achieving a uniform concrete matrix.
Avoid aggregates with high clay content, as they can hinder cement hydration and reduce strength. Consider using manufactured sands, which often have better gradation control than natural sands. Proper aggregate moisture content is also important; excessively damp aggregates can cause issues with cement hydration.
Cement Types Suitable for Dry Pour
Selecting the right cement is fundamental for dry pour concrete’s performance. Ordinary Portland Cement (OPC) is commonly used, offering a balance of cost and strength development. However, the specific type of OPC – Type I, II, or III – depends on project requirements.
Type I is a general-purpose cement suitable for most applications. Type II offers moderate sulfate resistance, beneficial in environments with soil or water containing sulfates. Type III, a high-early-strength cement, accelerates setting and strength gain, useful when rapid turnaround is needed.

Blended cements, incorporating supplementary cementitious materials (SCMs) like fly ash or slag, can enhance durability and reduce permeability. These SCMs react with cement hydration byproducts, improving long-term strength and resistance to chemical attack.
Low-heat cements are also an option, particularly for massive pours to minimize temperature rise and cracking. Always verify the cement meets relevant standards and is compatible with the chosen aggregates and admixtures.
Site Preparation for Dry Pour
Thorough site preparation is crucial for a successful dry pour concrete application. Begin by clearing the area of all vegetation, debris, and topsoil. Ensure the ground is stable and capable of supporting the concrete load, addressing any soft spots or unstable areas.
Accurate grading is essential to establish the correct elevation and slope for proper drainage; Compact the subgrade using appropriate equipment, such as a plate compactor or roller, to achieve a uniform density. This prevents settling and ensures a stable base.
Consider soil conditions; if the soil is highly expansive or prone to frost heave, stabilization measures like geotextiles or lime treatment may be necessary. Proper drainage systems should be in place to divert water away from the concrete slab, preventing moisture-related issues.
Finally, establish clear access routes for material delivery and equipment operation. A well-prepared site minimizes complications during the pouring and finishing stages.
Formwork Construction & Considerations
Formwork defines the shape and boundaries of your dry pour concrete project. Construct forms using sturdy materials like lumber, plywood, or steel, ensuring they are adequately braced and supported to withstand the concrete’s weight and pressure. Accurate alignment and leveling are paramount for a consistent, professional finish.
Consider the concrete’s anticipated slump and pressure when designing formwork. Forms must be watertight to prevent concrete leakage, utilizing sealant along joints and seams. Allow for slight form deflection by incorporating ties and walers for added stability.
Form release agents are essential to facilitate easy removal without damaging the concrete surface. Pay attention to corner details, reinforcing them to maintain sharp, clean edges. The formwork’s internal surface should be smooth to avoid imperfections transferring to the concrete.
Properly designed and constructed formwork is not merely a container; it’s a critical component influencing the final quality and dimensional accuracy of your dry pour concrete structure.
Base Preparation & Compaction
Proper base preparation is fundamental for the longevity and stability of your dry pour concrete slab. Begin by removing all vegetation, topsoil, and any loose debris from the designated area. Ensure the subgrade is firm and capable of supporting the anticipated load.
A well-compacted base prevents settling and cracking. Utilize a plate compactor or roller, applying multiple passes to achieve optimal density. The type of compaction equipment depends on the soil type and project scale. For granular bases, aim for at least 95% Proctor density.
Consider adding a layer of compacted gravel or crushed stone as a sub-base, particularly in areas with unstable soil. This improves drainage and provides a more uniform bearing surface. Ensure the base is level and consistently graded to facilitate even concrete distribution.
Thorough base compaction minimizes future issues, creating a solid foundation for your dry pour concrete, ensuring a durable and long-lasting result.
Reinforcement Placement (if required)
Reinforcement within dry pour concrete isn’t always necessary, but significantly enhances structural integrity, particularly for slabs subjected to heavy loads or ground movement. Wire mesh or rebar are common choices, depending on the project’s demands.
If using wire mesh, overlap adjacent sheets by at least one square to ensure continuous coverage. Support the mesh off the base using chairs or small concrete blocks, maintaining a consistent depth throughout the pour area. This prevents it from sinking into the concrete during placement.
For rebar, follow engineered specifications regarding size, spacing, and placement. Securely tie rebar intersections with tie wire to create a rigid cage. Proper rebar cover – the distance between the rebar and the concrete surface – is crucial for corrosion protection.
Accurate reinforcement placement before the dry pour process distributes stress and minimizes cracking. Always consult local building codes and a structural engineer for specific requirements.
The Dry Pour Process: Step-by-Step
The dry pour process begins with carefully distributing the pre-mixed concrete across the prepared formwork. Avoid dumping large quantities in one spot; instead, use shovels or a concrete spreader to achieve a uniform layer. This initial distribution establishes the base for subsequent layers.
Subsequent layers are added incrementally, ensuring consistent thickness throughout the pour area. Overlap each layer slightly with the previous one to promote bonding and eliminate voids. Avoid walking directly on the freshly placed concrete to prevent disruption.
Following each layer, perform initial consolidation. This doesn’t involve full compaction, but rather a gentle leveling and distribution of the material. Use a straight edge or rake to work the concrete into corners and around obstructions.
Continue layering and consolidating until the desired slab thickness is achieved. Remember, proper layering is fundamental to a strong, durable dry pour concrete structure. Careful execution at this stage sets the foundation for successful finishing.
Layering the Concrete Mix
Layering the concrete mix is crucial for achieving a consistently strong and durable slab when using the dry pour method. Begin with relatively thin layers, typically between 2 to 4 inches thick, depending on the overall slab depth and aggregate size. Avoid the temptation to pour thick layers, as this can lead to segregation and weak spots.
Each successive layer should slightly overlap the previous one, creating a staggered effect. This overlap promotes better bonding between layers, minimizing the risk of delamination. Ensure even distribution across the entire formwork area, avoiding concentrated piles.
As you add layers, maintain a consistent moisture content within the mix. While it’s a ‘dry’ pour, some inherent moisture is present. Consistent moisture aids in cohesion and workability. Avoid adding water directly during layering, as this can alter the mix design.
For deeper slabs, consider using a concrete spreader or a rake to assist in distributing the mix evenly. Proper layering is the cornerstone of a successful dry pour concrete application, ensuring long-term structural integrity.
Initial Consolidation Techniques
Initial consolidation of the dry pour concrete mix is vital, even though it differs from traditional wet concrete methods; The goal isn’t to remove air bubbles with vibration, but to ensure the aggregate is properly seated and the mix is densified. Avoid excessive compaction, which can cause segregation.
A simple, effective technique involves repeatedly raking or lightly dragging a straight edge across the surface of each layer. This helps to settle the aggregate and eliminate voids. For larger areas, a plate compactor with a rubber base can be used, set to a low frequency to prevent over-compaction.
Hand tamping with a flat board is also beneficial, particularly around the edges of the formwork and in areas difficult to reach with other tools. Focus on achieving a uniform density throughout each layer before adding the next.
Remember, the dry pour mix relies on the interlocking of aggregate for strength. Gentle consolidation enhances this interlocking, creating a stable base for subsequent layers and finishing processes. Proper initial consolidation sets the stage for a durable, long-lasting slab.
Screeding the Concrete Surface
Screeding is a crucial step in achieving a level and even surface with dry pour concrete. This process involves using a straight edge – often a wooden or metal board – to remove excess concrete and establish the final grade. It’s best performed immediately after initial consolidation and layering.
Ideally, screeding requires two people, one on each side of the screed board. Working in a sawing motion, pull the board across the concrete surface, maintaining a consistent angle. Ensure the board spans across any irregularities to effectively level the material.
For larger pads, consider a powered screed, which automates the process and provides a smoother, more consistent result. However, manual screeding offers greater control for smaller projects or intricate shapes.
Fill any low spots identified during screeding with additional dry pour mix, and repeat the process until a uniformly level surface is achieved. A well-screeded surface is essential for successful floating and finishing, ultimately impacting the concrete’s final appearance and functionality.
Floating and Finishing Techniques
Floating follows screeding, embedding the larger aggregate and removing minor imperfections. This stage prepares the surface for finishing. Utilize a float – either wood or magnesium – and work it in overlapping arcs, applying consistent pressure. Wood floats create a slightly rougher texture, while magnesium floats produce a smoother finish.
Finishing refines the surface, achieving the desired texture and smoothness. This is typically done with a steel trowel. Begin with a flat trowel, making overlapping passes. As the concrete sets, increase the angle of the trowel for a progressively smoother finish.
The choice between power floating and hand floating depends on the project size and desired finish. Power floats are faster and more efficient for large areas, while hand floating offers greater control for smaller projects or detailed work.
Avoid over-troweling, as this can weaken the surface and lead to scaling. Proper floating and finishing are vital for durability, aesthetics, and achieving a professional-looking dry pour concrete surface.
Power Floating vs. Hand Floating
Power floating utilizes a mechanical float, significantly accelerating the finishing process, particularly on expansive dry pour concrete slabs. These machines, powered by gas or electricity, deliver consistent pressure and coverage, ideal for large-scale projects demanding efficiency. They excel at initial flattening and creating a uniform surface texture.
However, hand floating offers unparalleled control and precision. Skilled operators can navigate intricate details and adjust pressure to address localized imperfections. This method is best suited for smaller areas, confined spaces, or projects requiring a specific, customized finish. Hand floating allows for a more tactile approach, ensuring thorough consolidation.
The decision hinges on project scope and desired outcome. Power floating prioritizes speed and uniformity, while hand floating emphasizes finesse and adaptability. Often, a combination is employed – power floating for the bulk of the work, followed by hand floating for edging and detailed finishing.
Consider the operator’s skill level and the concrete’s setting time when choosing between these techniques. Both contribute to a durable, aesthetically pleasing dry pour concrete surface.
Troweling for a Smooth Finish
Troweling is a crucial step following floating, transforming a textured surface into a sleek, durable finish on dry pour concrete. This process utilizes a flat, steel tool – the trowel – to compact and polish the concrete, reducing surface imperfections and increasing density.
Begin with a bull float trowel for initial smoothing, covering larger areas efficiently. As the concrete sets, transition to a hand trowel for finer detailing and achieving the desired smoothness. Multiple passes are typically required, gradually increasing pressure with each pass.
The timing of troweling is critical. Starting too early can disrupt the concrete’s structure, while delaying too long makes it difficult to achieve a smooth result. Observe the concrete’s surface; it should be firm enough to support your weight without excessive indentation.
Proper technique involves overlapping each pass by approximately 50%, maintaining consistent pressure, and keeping the trowel blade flat against the surface. A well-troweled surface exhibits a high sheen and exceptional resistance to wear.
Curing Dry Pour Concrete
Curing is arguably the most vital stage after placing dry pour concrete, directly impacting its final strength and durability. It’s the process of maintaining adequate moisture and temperature levels to allow the cement to properly hydrate and gain strength. Neglecting this step can lead to cracking, reduced strength, and surface scaling.
Several curing methods are effective. Water curing involves keeping the surface continuously wet using sprinklers or soaker hoses. Covering with plastic sheeting traps moisture, creating a humid environment. Applying curing compounds forms a membrane that slows evaporation.
The duration of curing depends on cement type, ambient temperature, and desired strength. Generally, a minimum of 7 days is recommended, with 28 days achieving near-full strength. Consistent moisture is key, especially during the initial 72 hours.
Proper curing minimizes shrinkage cracks and maximizes the concrete’s potential. Regularly inspect the surface to ensure adequate moisture retention and address any dry spots promptly. A well-cured concrete surface is significantly more resistant to abrasion and weathering.
Curing Methods for Optimal Strength
Achieving optimal strength in dry pour concrete hinges on selecting and implementing effective curing methods. Water curing, consistently wetting the surface, remains a gold standard, ensuring continuous hydration. This involves ponding, sprinkling, or using soaker hoses – maintaining saturation is crucial.
Plastic sheeting offers a convenient alternative, trapping moisture and creating a humid microclimate. Overlap seams and secure edges to prevent evaporation. Curing compounds, sprayed onto the surface, form a membrane that retards moisture loss, proving particularly useful for larger areas.
Wet coverings, like burlap kept consistently damp, provide a balance between moisture retention and cost-effectiveness. Consider ambient temperature; warmer conditions accelerate hydration but also increase evaporation rates, demanding more frequent moisture application.
Regardless of the method, aim for at least 7 days of consistent curing, extending to 28 days for maximum strength development. Regular inspection is vital to address any drying or compromised coverage, ensuring a durable and resilient concrete structure.
Common Problems and Solutions
Dry pour concrete, while efficient, can present challenges. Cracking often stems from rapid drying; proper curing, as detailed previously, is paramount. Settlement can occur if the base isn’t adequately compacted – thorough preparation is key. Dusting, a surface weakness, indicates insufficient finishing or improper floatation techniques.
Scaling, where the surface flakes, suggests overworking during finishing or using an inappropriate mix design. Cold joints, visible lines between pours, necessitate prompt consolidation of each layer. Honeycomb, voids within the concrete, points to insufficient vibration or a mix lacking adequate fines.
Solutions include re-vibrating areas with honeycomb, applying a bonding agent before subsequent pours, and adjusting the mix design with more cement or fines. For dusting, consider a surface hardener. Addressing base compaction before pouring prevents settlement. Always prioritize consistent moisture control to mitigate cracking and scaling.
Careful observation during and after the pour allows for timely intervention, ensuring a high-quality, durable concrete surface.
Safety Precautions During Dry Pouring
Dry pour concrete operations demand strict adherence to safety protocols. Dust inhalation is a primary concern; always wear a properly fitted N95 respirator, especially during mixing and pouring. Eye protection, such as safety glasses or goggles, is crucial to prevent irritation from dust and potential splashes.
Protective clothing, including gloves and sturdy boots, shields skin from abrasion and chemical burns from the cement. Hearing protection is recommended when operating power tools like compactors or power floats. Be mindful of ergonomics – lifting heavy bags of concrete can cause strain; utilize proper lifting techniques or mechanical assistance.
Ensure adequate ventilation, particularly when working indoors or in confined spaces. Maintain a clean and organized work area to prevent trips and falls. Be aware of equipment hazards – follow manufacturer’s instructions and maintain equipment regularly. Sun protection, including hats and sunscreen, is vital for outdoor pours.
Finally, always have a first-aid kit readily available and know the location of emergency services. Prioritizing safety ensures a productive and injury-free concrete pour.
Cost Considerations for Dry Pour Concrete
Dry pour concrete costs vary significantly based on several factors. The primary expense is the concrete mix itself, priced per cubic yard, fluctuating with cement and aggregate costs. Material delivery adds to the budget, dependent on distance and quantity. Equipment rental, including compactors, floats, and trowels, represents a substantial cost, potentially mitigated by ownership if frequent pours are planned.
Labor costs are significant, especially if professional assistance is required for mixing, pouring, and finishing. Formwork materials, such as lumber or prefabricated forms, contribute to the overall expense. Site preparation, including base compaction and reinforcement, adds to the total. Curing compounds, while relatively inexpensive, are essential for long-term durability.
Compared to traditional wet concrete, dry pour can potentially reduce costs through minimized water usage and simpler mixing. However, larger projects may benefit from the efficiency of ready-mix concrete. Thoroughly assessing project needs and obtaining multiple quotes is crucial for accurate budgeting.
Want a smooth, crack-resistant concrete surface? Our dry pour concrete instructions simplify the process! Learn pro tips & create beautiful patios, floors & more. ✨